Table of contents
If you deploy your website to VPS chances are every time you want to deploy your changes from your Github repo you need to first SSH to your VPS and then execute some commands to deploy your website. There's a way to automate this activity using Github actions.
Concept
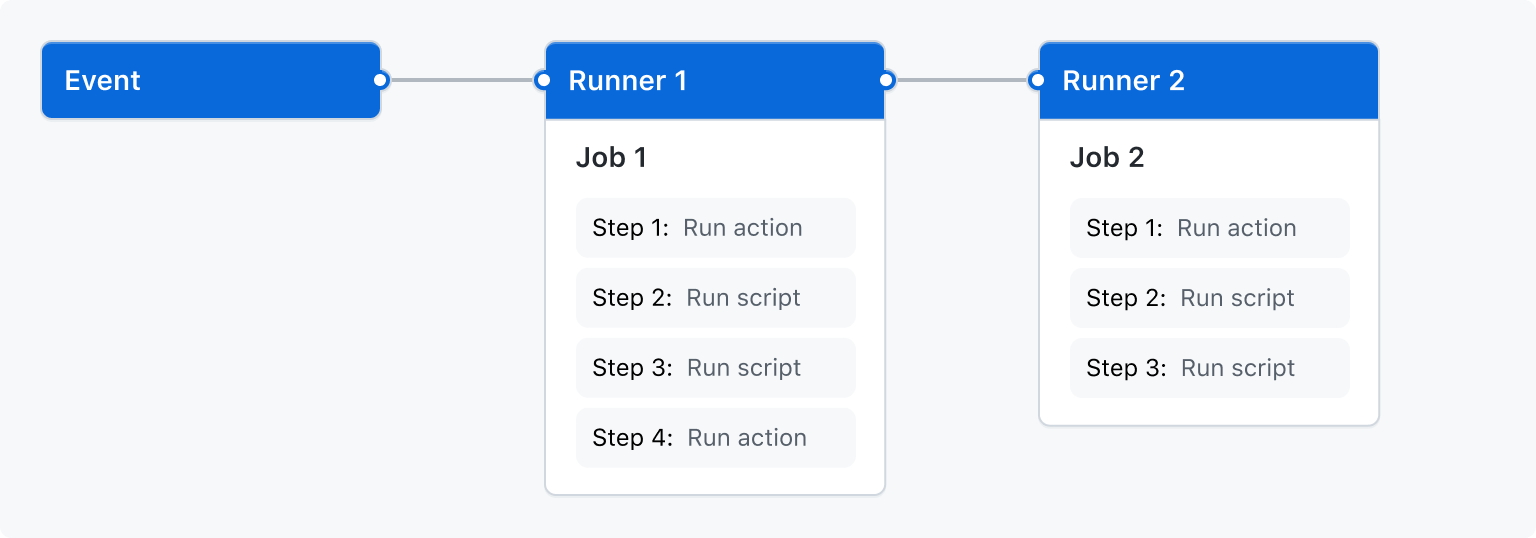
Github actions is a tool automate, execute, and customize your software development workflows right in your repository. You can perform any job you'd like in a customized workflow with this tool.

There are some concept you need understand in order to use Github Actions
Workflows
A whole automated process that will run one or more jobs is called a workflow. One repository might have one or more workflows defined at
.github/workflowsEvents
An event is an activity that might trigger the job to being executed like pull request, commit, or create an issue.
Jobs
A job is a series of step that will executed every time an event occurs.
Actions
An action is like a package that you can use to perform repeated task such as connect to SSH so your workflow code is shorter.
Runners
A runner is a virtual machine that run your jobs. This runner is managed by Github so do not worry about it.
Implementation
In order to automatically deploy our website to VPS every time there's a change in our repository first we need to create a workflow named .github/workflows/dev.yml . The name of the file is not going to affect anything so you can name the file whatever you want.
I will explain every part of the workflow inside the code.
# Name of the workflow
name: Development CD

# This is an event that trigger the workflow for being executed
# This means that everytime you push your changes to main branch
# wheter it is from pull request or directly push to the branch
# the workflow will triggered
on:
  push:
    branches:
      - main

# The push event will trigger this job to being executed
jobs:

  # Below line defines the name of the job
  deploy:

    # Below line defines what runner we will be using
    # You can choose Windows, Linux, or Mac-OS
    runs-on: ubuntu-latest

    # This job only contains one step, it is to deploy to VPS
    steps:
      - name: Deploy to Sandbox

        # Below line define action that we will be using
        # This action is like a package that someone built
        # to make a SSH connection to a remote machine
        uses: appleboy/ssh-action@v0.1.8

        # Below configuration is an input parameter for the action.
        # You can check to the action documentation on how to use it
        # and what are required inputs you need to define
        with:

          # Below lines define SSH credential to the VPS
          # You can type your credential directly on these lines
          # But you do not want other person know the access to your VPS.
          # So you can utilise action secrets and variables
          host: ${{ secrets.DEPLOY_HOST }}
          username: ${{ secrets.DEPLOY_USERNAME }}
          key: ${{ secrets.DEPLOY_SSH_KEY }}
          port: ${{ secrets.DEPLOY_SSH_PORT }}

          # Below lines is a script input that the action will execute
          # This will be executed in VPS when it successfully connect to the SSH
          # Custom this script to your need
          script: |
            cd /var/www/sandbox
            git pull origin main
One more thing to make this workflow works is to setup the credential both to your VPS and github repository.
Make sure you clone the repo in VPS using SSH and give the VPS SSH access to the repo
Create new SSH key pair on your local machine
Append the public key to VPS authorized key
Setup repository secret like the image below including the SSH secret key to DEPLOY_SSH_KEY

And that's how you automate your deployment to VPS using Github Actions. Thanks!
References:
https://docs.github.com/en/actions
https://github.com/appleboy/ssh-action

